Learn how to create a subdomain easily in Blogger using Google Domains. Create a subdomain or forward your subdomain to a destination URL in Google Domains for Blogger.
If you are searching for how to create a subdomain in Blogger using Google Domains and not sure how to create a subdomain in blogger then no worries. In this article I'm going to show you clearly how you can create a subdomain in blogger using Google Domains with screenshots.
First lets understand what a subdomain is in short description.
What is a Subdomain?
A Subdomain is a part of your custom domain which you have purchased for your personal or business website.
You can create multiple subdomains using your main domain.
Subdomains are seen as a different sites by Google and other search engines.
You can use subdomains to build a blog, store, static site or rank on completely new keywords.
Here is an example of a sub domain blog.yourwebsite.com or store.yourwebsite.com. Here, the prefix words like blog & store are used for creating a subdomain.
While creating a subdomain remember that your site might be temporarily down for a few minuets.
How To Create A Subdomain In Blogger Using Google Domains?
We will see how to Create a subdomain in blogger using Google Domains registrar.
Create a Subdomain using Google Domains in two ways:
1. Directly from Blogger
2. In Google Domains DNS settings
1. Directly from Blogger:
The first and easiest way for creating a subdomain, without any knowledge of DNS settings in Google Domains is through blogger itself.
Note: You must be the owner of the domain to create a subdomain in blogger. This process worked for me and hope it works for you as well.
To create a subdomain in blogger using Google Domains registrar go to www.blogger.com
Sign in with your Google Account.
Click on create a new blog.
Now enter the name(title) of the blog.
Now enter your desired URL like for example mywebsiteshop.blogspot.com & click on save to continue.(Don't worry this is not your subdomain.)
Make sure the keywords of your URL is unique and defines your website.
Now your blog is created.
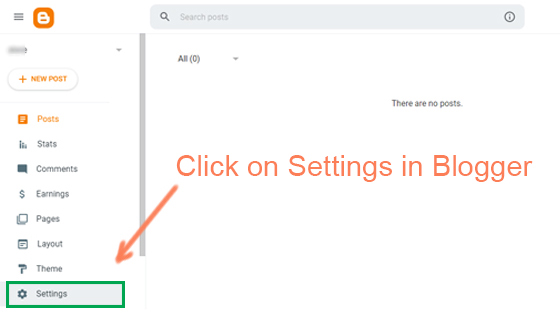
In Blogger go to settings.
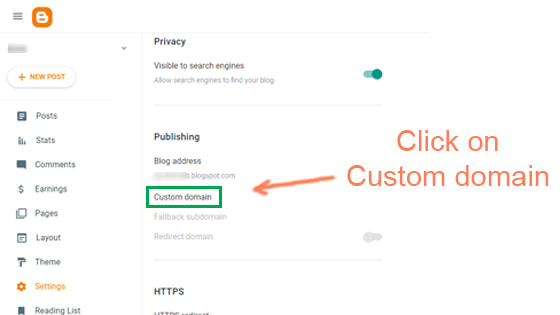
Click on custom domain.
Now enter the subdomain which you want & click save.
You have successfully created a subdomain in blogger.
For few minutes your subdomain might not work. So give it some time to get automatically registered in your DNS settings in Google Domains.
You can view your subdomain details in Google Domains DNS settings, under synthetic records.
2. Create subdomain in Google Domains DNS settings:
This is the second process to create a subdomain. Lets learn how to create a subdomain in google domains.
To create a subdomain directly from Google Domains and link it to blogger host, follow the instructions.
This process worked for me & I hope it works for you as well.
You have to add CNAME record in Custom resource records in Google Domains DNS settings.
Custom resource records define how your domain works. It is used to connect your domain to a website as well as custom emails.
Login to Google Domains(https://domains.google.com/registrar/) using your Google Account.
Go to my domains and select the domain through which you want to create a subdomain.
Now go to DNS settings
Scroll down to Custom resource records and enter the subdomain details.
For subdomains, you should always use the CNAME type.
If you are to add that subdomain, it should be:
NAME: shop
TYPE: CNAME
TTL: 1H
Data/Value: yourwebsite.com (not www.yourwebsite.com)
NAME: shop
TYPE: CNAME
TTL: 1H
Data/Value: yourwebsite.com (not
example of a subdomain: shop.yourwebsite.com
Click on Add button.
Now you can see that you have created a CNAME.
Now in Blogger, go to Blogger settings and enter your subdomain in custom domain settings.
Don't forget to enable HTTPS settings.
Wait for few minuets or possibly hours while the changes in DNS settings takes place.
Refresh your page go to DNS settings and scroll down to Synthetic records. You can clearly see your subdomain details.
That's it. You have successfully created a subdomain with Google Domains registrar.
Always remember that any changes may take effect after several minutes to 24-48 hours across the entire internet.
This is how you can easily create a subdomain in blogger using Google Domains registrar. Hope this article helped you. Do share this with your friends.


0 Comments